

MediaStar Manual
Section 1: Initial Setup
Before you start using the MediaStar software, it is recommended that you perform some initial configuration. This involves changing some windows settings, installing some codecs, extending your desktop to a projector (if needed) and registering the software.
1. Windows Settings
We highly recommend that you go into the control panel and disable automatic updates, the computer going to sleep, setting all power options to always on, and disabling the screen saver.
Select the operating system that you have for more information Windows XP - Windows 7
2. Codec Pack (FFDShow)
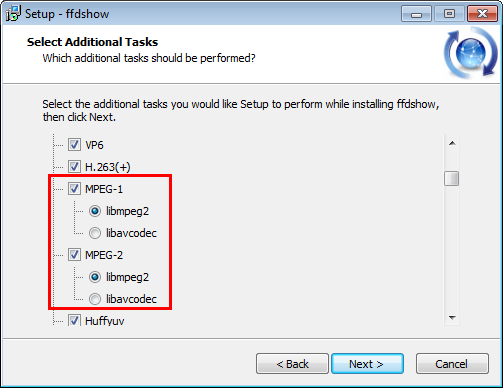
To play popular media types, you need to install a codec pack on your computer. We recommend FFDShow, and it is available free HERE, or you can download it directly from HERE. When you are installing FFDShow it is important to select MPEG1 and MPEG2 when you reach that point (a page with a lot of checkboxes).
3. Extended Desktop (Optional)
If you plan on using video, images, or a live camera in your show, the desktop must be extended to an external monitor or projector before you start MediaStar. This will place the monitor window on the second screen so that you can use the computer for the presentation screen and the second monitor for video.
Select the operating system that you have for more information: Windows XP - Windows 7.
4. Registration
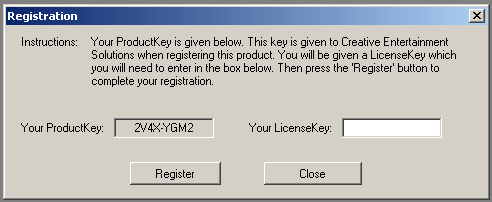
If you have not registered MediaStar on this machine before, the software is operating in trial mode. The only limitation of trial mode is that you are limited to 10 seconds of playback per track in playback mode. To register MediaStar access the registration dialog via Help -> Register. Then follow the directions on the dialog to register your copy of MediaStar. If registration is successful, the Register selection will disappear from the Help menu.
5. MediaStar Settings
There are many settings available in MediaStar. This section details these settings.
External Monitor Settings
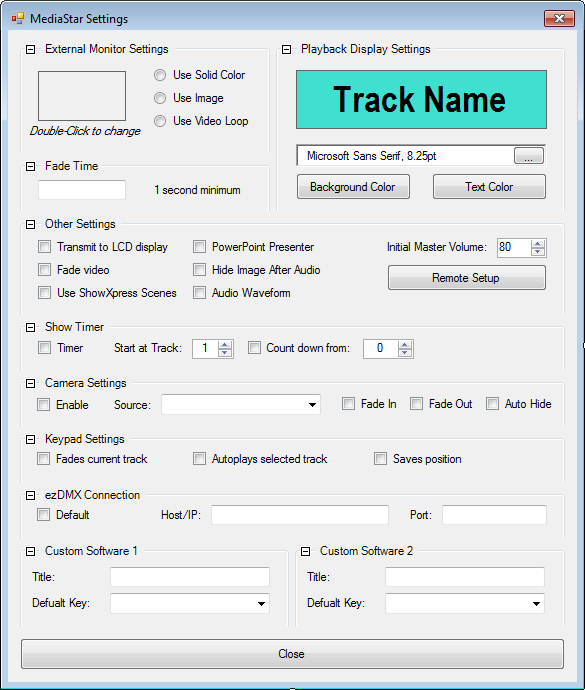
This section will allow you to change the appearance of the monitor (if you are using an exteded desktop). You have the option of a solid color, image, or video loop. Choose the one you want, and then double click on the box to select the color or file for your background.
Playback Settings
This section will allow you to change the colors for the Playback Window's displays. Simply press the button corresponding to the color that you want to change and the color will be updated to your selection. You can also change the font for the current and next track displays to fit more text.
Fade Time
This is the time that it will take a track to fade from 100% to 10% and must be at least 1 second. The last 10% takes 2 seconds and cannot be changed. Therefore the total fade time is always what you enter plus 2 seconds.
Other Settings
| Transmit To LCD Display | Transmit the current and next track to the LCD display during playback mode. Only turn this on if you have, and are intending to use the LCD display. |
| Fade Video | Fade the video to black when performing a fade. |
| Use ShowXpress Scenes | Use scenes instead of macros for ShowXpress. Please contact us if you want to use this setting. |
| PowerPoint Presenter | Required when using Presenter View in PowerPoint. |
| Hide Image After Audio | Automatically hides any images show by marks within a track after the track finishes. |
| Audio Waveform | Generates a waveform graph in the track's advanced settings. |
| Initial Master Volume | Default master volume (seperate from track volume). |
| Remote Setup | Configures remote functions (see below). |
Show Timer
A simple timer that will count up once you start playing the selected track. The timer will stop once you have finished the last track in the playlist. Alternatively, you can choose to have the timer count down from a predetermined time.
Camera Settings
Interface with a live camera that is attached to the computer. The camera must be DirectShow compatible and must be connected before MediaStar is started. Once the camera is enabled, select the source in the drop down box.
Fade In and Fade Out fade the camera feed in from black and out to black when the camera is shown or hidden using a track mark. Auto Hide will automatically hide the camera within a track, after the track finishes.
Other Settings
| Fades current track | Immediately fade the current track (if applicable). |
| Autoplays selected track | Plays the selected track automatically after queuing. |
| Saves position | Return to the currently queued track after the selected track has finished. If the current track was playing, the next track will be queued. |
ezDMX Connection
Sets where to look for ezDMX. By default the software should be running on the same computer as MediaStar but you have to option of connection to a remote machine using a host name or IP and a port number.
Custom Software 1 & 2
Sends a keystroke to another running application. Can be used to trigger third party software. Please contact us if you want to use this setting.
6. Remote Setup
The Remote Setup dialog allows you to configure the functions of the remote buttons. You can select the action that will occur when Media is playing, and when it is NOT playing. Keep in mind that these actions are for BOTH the handheld and ankle remote. Also, when the ankle remote is used with the magnet, it is the same as pressing button 1.
** Buttons 3 + 4 will always end a PowerPoint if one is active.
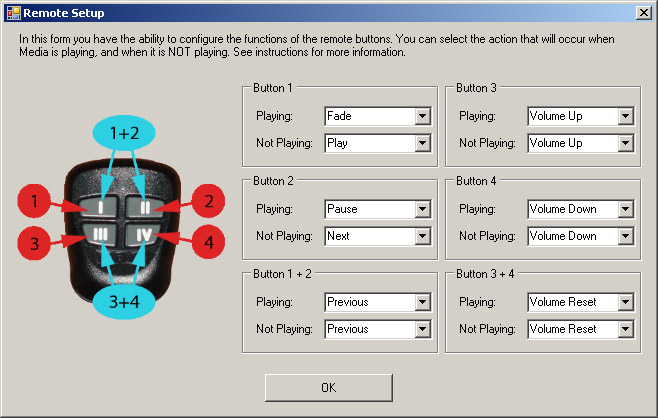
| Play | Play media or start PowerPoint. |
| Pause | Pause media. |
| Fade | Fade media and queue to next hard mark or track, or next PPT slide. |
| Next | Queue to next hard mark or track, or next PPT slide. |
| Previous | Queue to previous hard mark or previous media, or previous PPT slide. |
| Volume Up | Increase master volume by 10%. |
| Volume Down | Decrease master volume by 10%. |
| Volume Reset | Reset master volume to default. |
| Keypad #01 | Simulate selecting track 1 with the keypad. |
If you have any questions that were not answered in these sections, feel free to contact us by email at woodie@theceswebsite.com or by phone at 216.661.8000.